- Dual Output vs. Single Output: Unlock Greater Flexibility for Your Permanent Outdoor Lights
- Why ASAHOM Permanent Outdoor Light Installations Over 200ft Need Extra Power Injection?
- The Simple, Secure Seal: Why ASAHOM's Waterproof Connectors Are a Game-Changer
- Unleash Your Creativity: How ASAHOM's Palette & Effect Combo Redefines Smart Lighting
- Why Your Outdoor Lights Stay Connected: The Truth About WiFi & Why ASAHOM Uses 2.4GHz
- Beyond Simple Splitting: How the ASAHOM T-Splitter Redefines Smart Lighting Control
- Redefine Your Night: The Power of Zone Control with ASAHOM
Fault Detection Module
What is it for?
Quickly identify why some lights are off or acting abnormally.
What can it detect?
The Fault Detection Module helps you locate issues like:
- Power loss
- Signal failure
- Broken light sections
Think of it as a circuit tester for your light setup.
Step-by-Step Troubleshooting
Step 1 – Turn On Detection in App
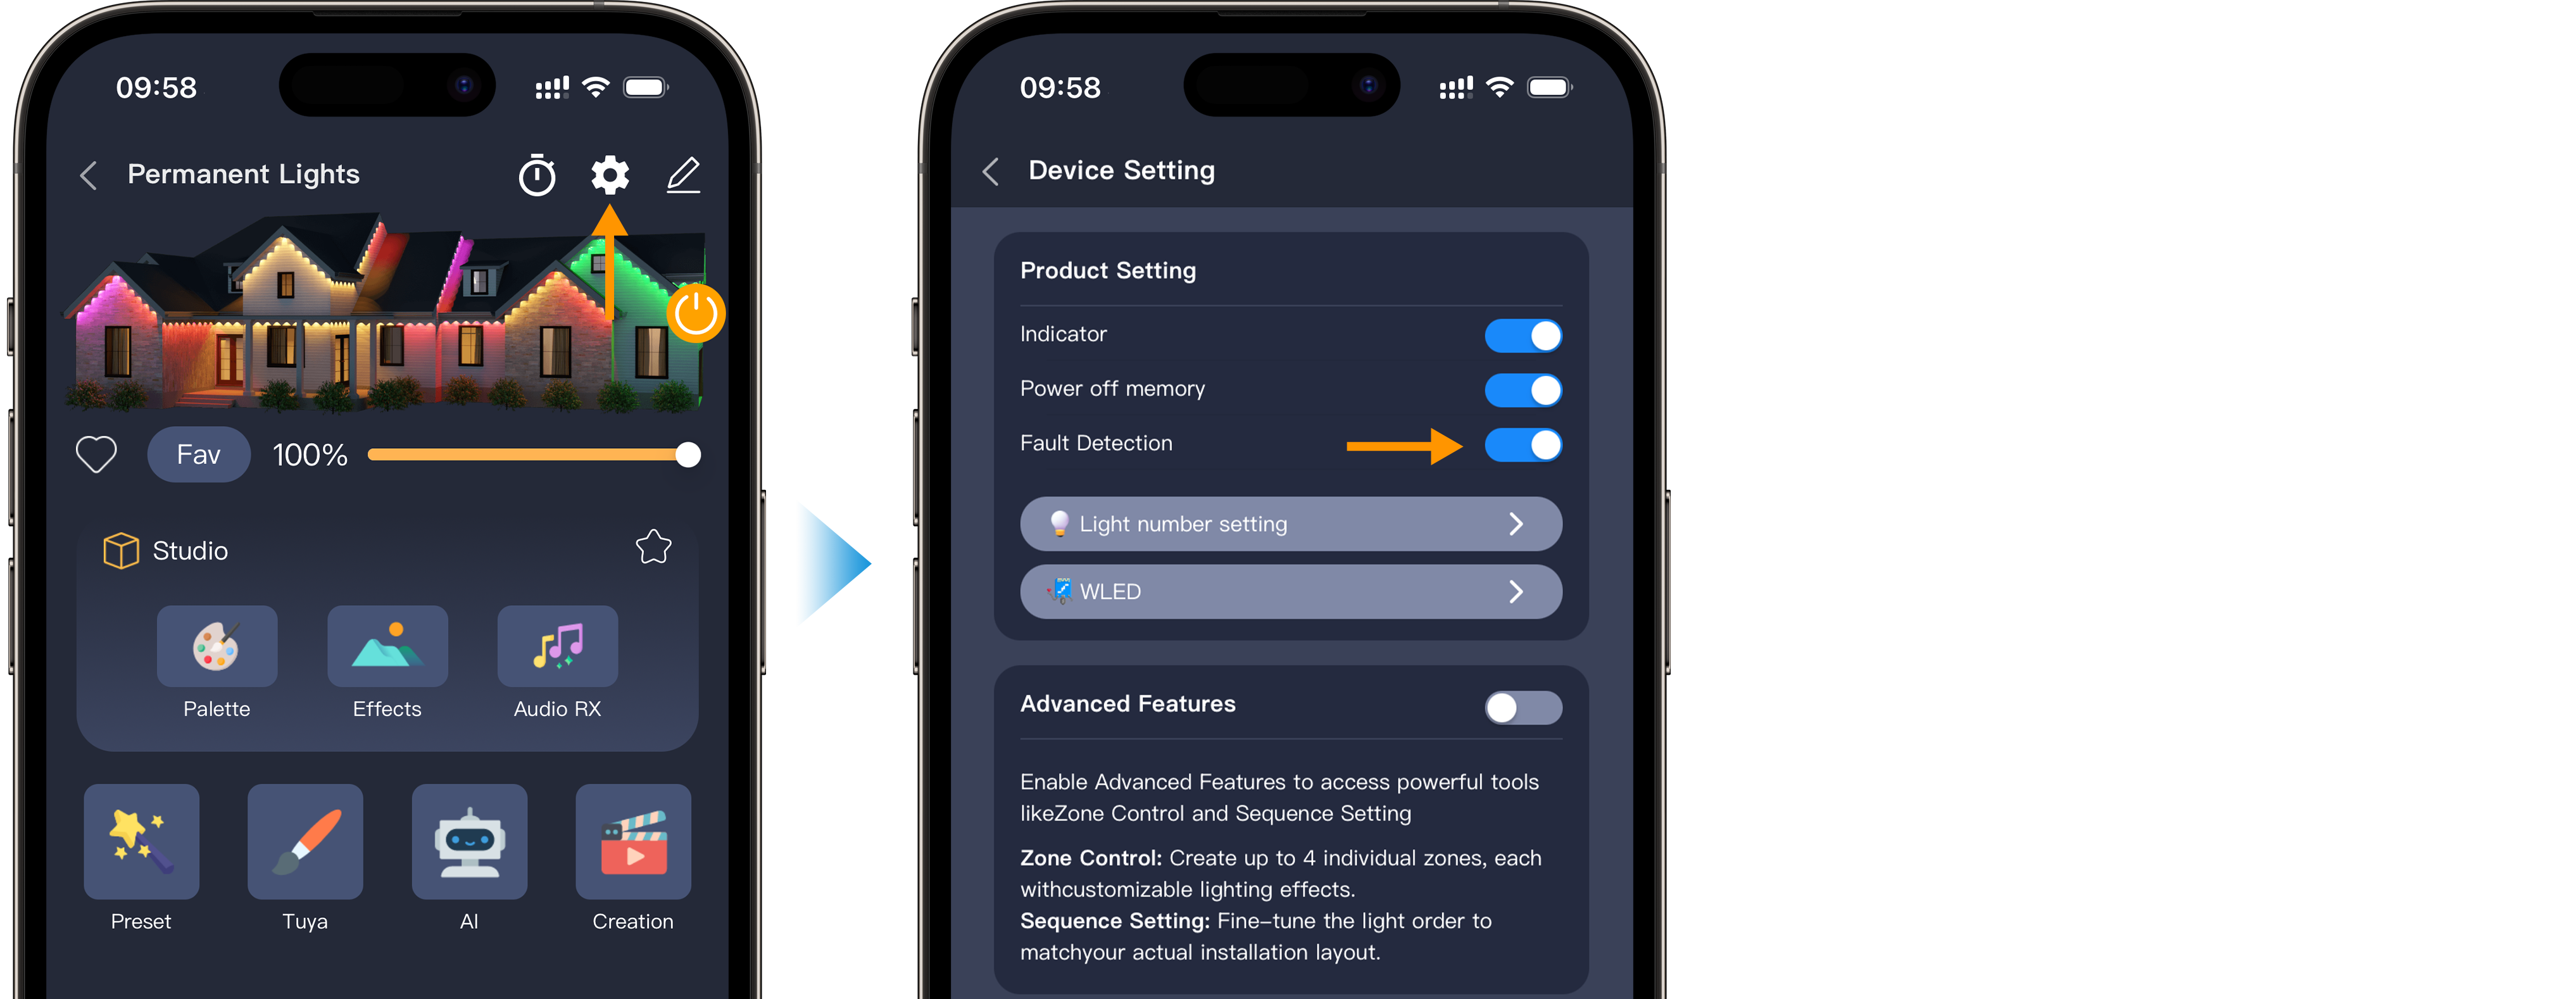
Why: The module won’t work unless the App detection mode is active.
Step 2 – Insert the Module
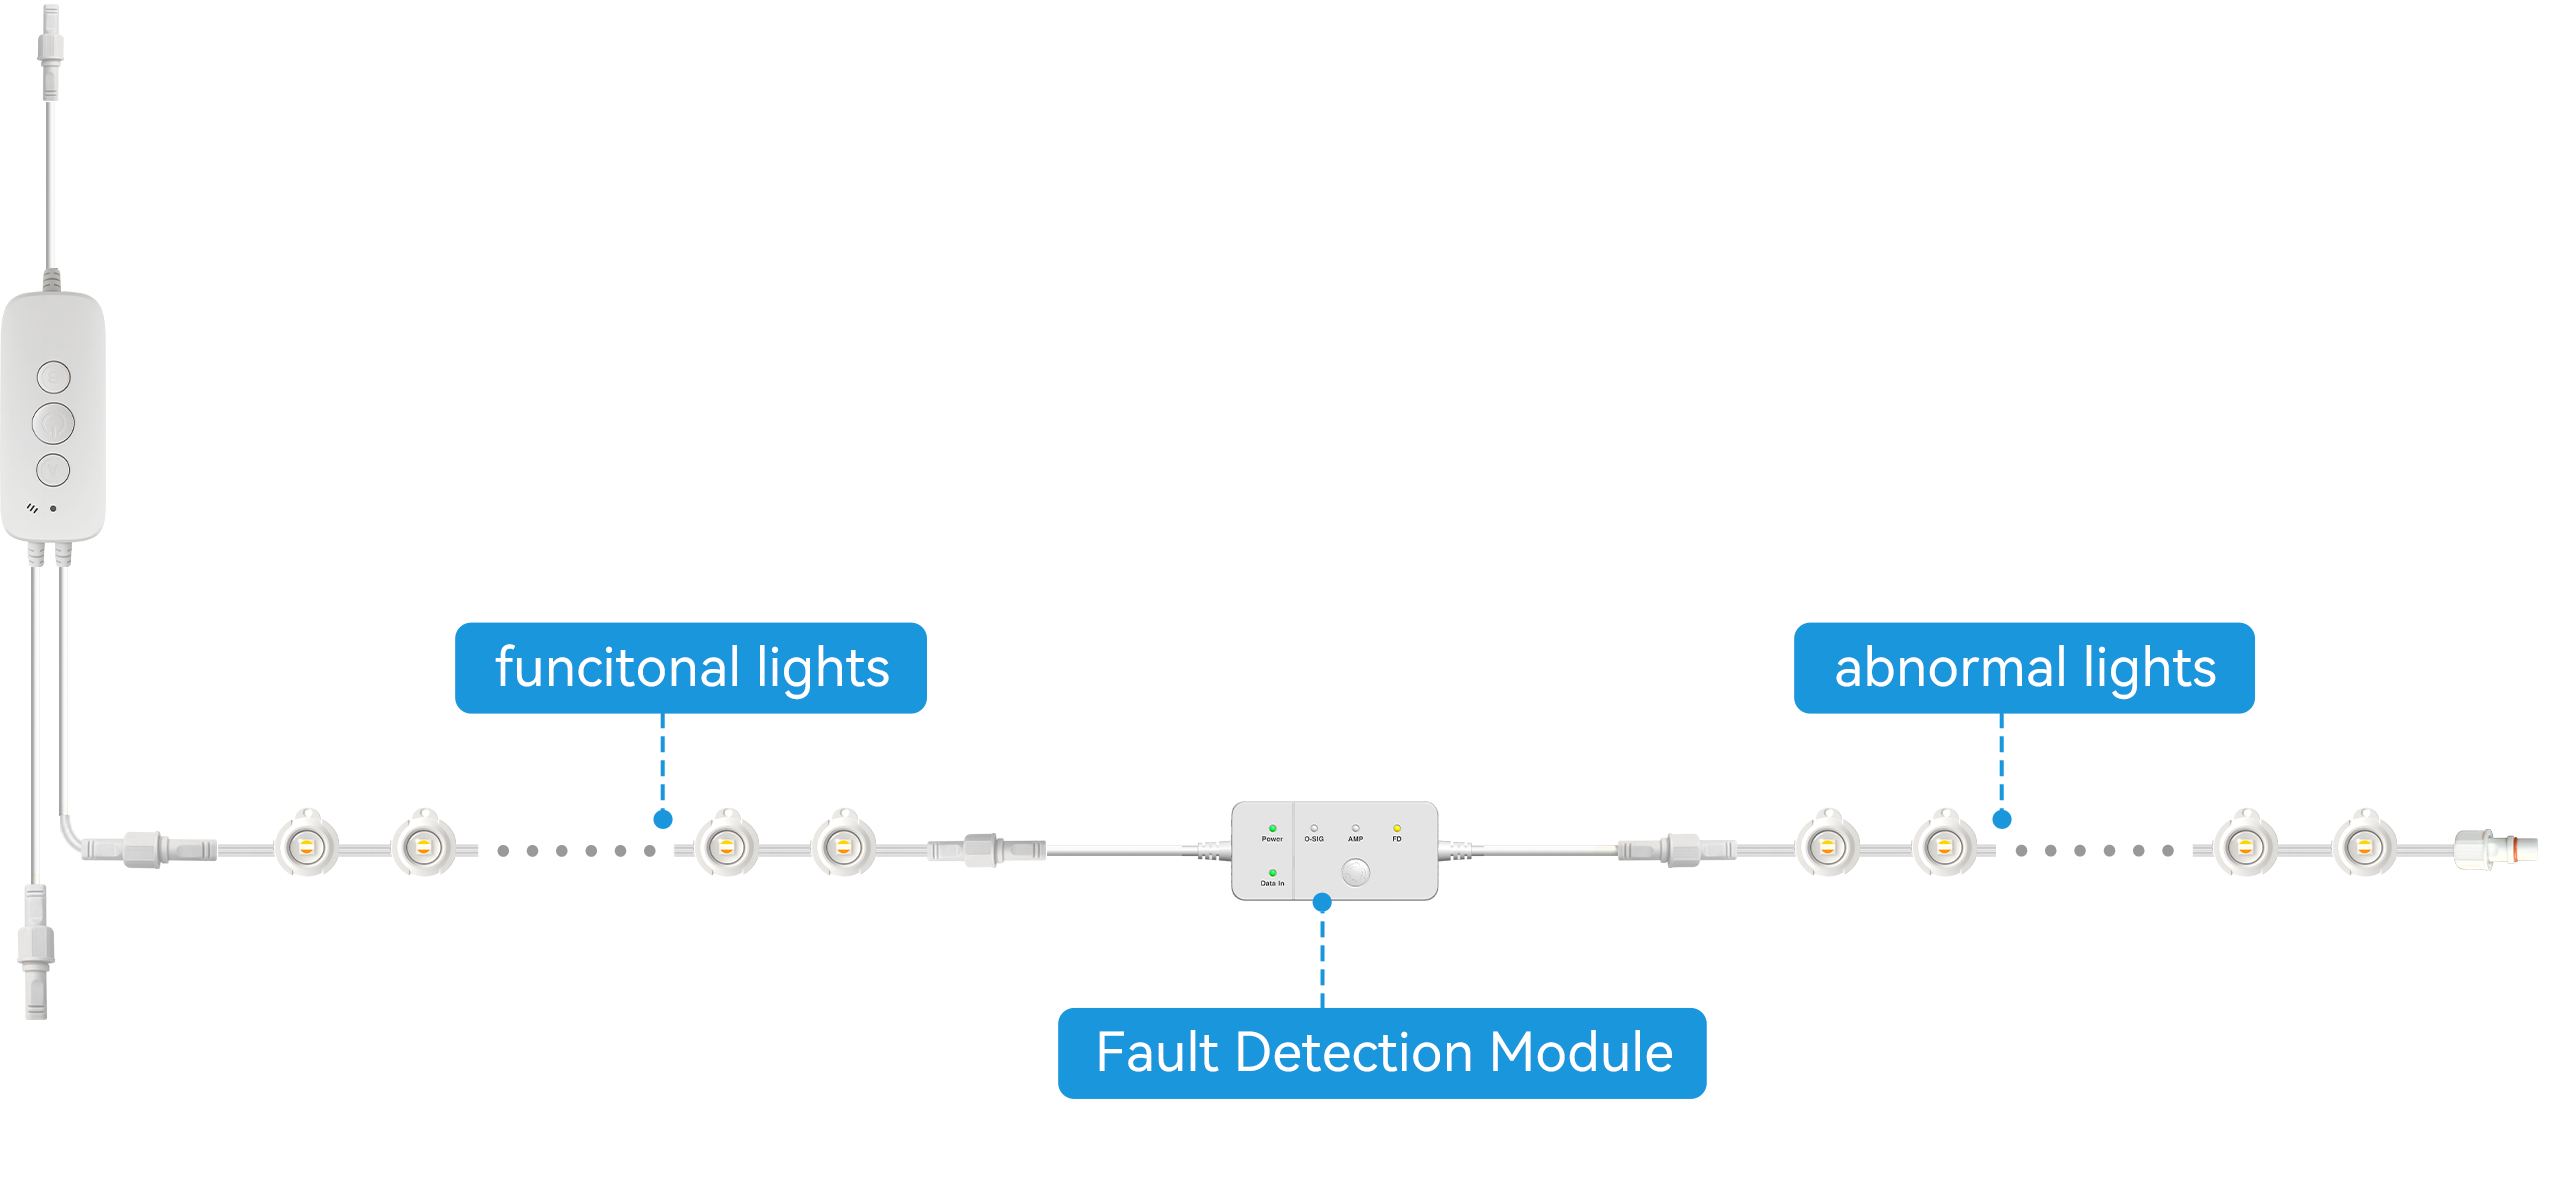
Where to Insert:
- Find the point before the lights stop working or behave abnormally
- Unplug that section and insert the module in between
Example:
If Section 1–4 works but Section 5–8 doesn’t, insert the module between 4 and 5
Step 3 – Check the Module Lights

| Indicator | Meaning |
| Power | Shows if electricity is coming through |
| Data In | Shows if a signal is detected from the controller |
How to judge:
Both OFF → No power or signal detected. The issue is before the module.Move the module earlier in the light chain and repeat these steps.
Power ON、Data In OFF→Power is OK, but no signal. The issue may be before the module, but you should test the lights after the module.Go to Step 4 and use FD mode to test lights after the module.
Power ON、Data In ON→Power and signal detected, but lights still don’t respond. The issue may be before or after the module.Go to Step 4 and use FD mode to verify the lights after the module.
Step 4 – Use Test Modes
Press the button on the module to switch test modes.
| Mode | What It Does | When to Use |
| FD | Sends built-in test signal (lights flash through RGBCW colors) | Check if lights after module still work |
| O-SIG | Forwards original signal from controller | Check if controller signal is good |
| AMP | Amplifies signal from controller | Use if O-SIG doesn’t work (signal is weak) |
Usage Tips:
FD Mode: FD Mode sends a self-generated test signal to check if the lights after the module are working properly.
| Result | Meaning | Action |
| Lights flash (Red, Green, Blue, 2700K, 6500K) | Rear lights are working | Go back to Step 3 and check earlier sections |
| No lights flash | Rear lights are faulty or disconnected | The lights after the module may be damaged. Please contact customer support for replacement |
O-SIG Mode: O-SIG Mode forwards the original signal from the controller to the lights.
| Result | Meaning | Action |
| Lights behave normally | Controller signal is OK | No fault found. Inspect physical connections if needed |
| No lights respond | Controller signal may be weak or interrupted | Switch to AMP Mode to boost the signal |
AMP Mode: AMP Mode amplifies the signal from the controller to help overcome signal loss over distance or poor wiring.
| Result | Meaning | Action |
| Lights now respond | Signal was too weak, AMP mode fixed it | You may need a signal amplifier. Please contact customer support for solutions |
| Still no lights respond | The problem may be before the module | Move the module closer to the controller and test again |
Final Tips
- This module is not waterproof, and should only be used temporarily
- Do not leave connected during regular operation
- If unsure where the issue is, move the module step by step along the line and repeat the above
Updated on 18 May 2026
What are your Feelings?
Thanks for your feedback
- Choosing a selection results in a full page refresh.
- Opens in a new window.